Can You Varnish Bob Ross’s Painting?
To make Bob Ross painting long lasting, varnish is a very important part. It creates an extra protective transparent layer, which gives protection from dust, scratch, heat, water, bugs, and more. So after dry painting 100%, I highly recommend varnish painting as soon as possible.
In this article, I will explain properly:
- Proper varnish time
- How to prepare a painting for varnish
- Applying varnish
- Some tricks!
What is the best time for vanish Bob Ross’s painting
Before applying varnish, painting completely dry and curing is very important. In the painting, there are many layers. More layers mean more time to dry. However, depending on the weather, the painting can take around 6-12 mounts to completely cure and dry. After drying completely, you can go for varnish.
You can easily check if your painting is completely dry or not. Cut a very small amount of painting with a razor from any area. Then take the paint in your 2 fingers and push it. If it looks like hair, the paint is not properly dry yet, and if you see the paint break down like dust, the painting is completely dry.
You should check the article for more information, How long does Bob Ross wet-on-wet oil painting take to dry?
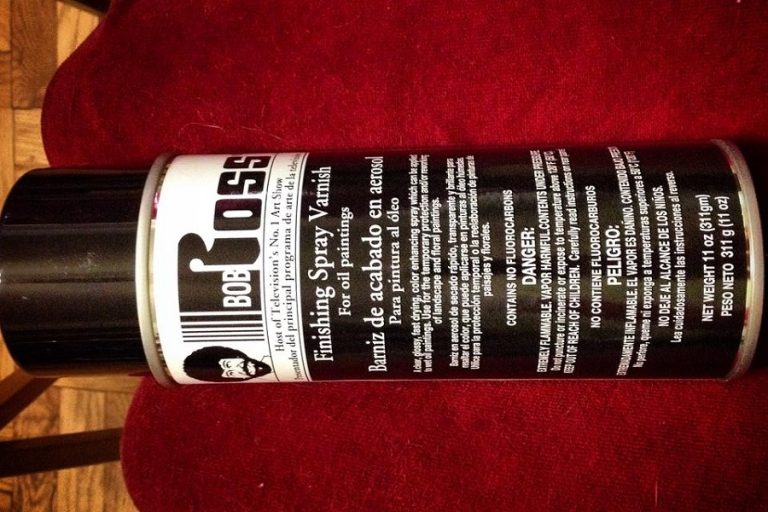
Bob Ross varnish and a good alternative
In the market, 2 types of varnish are available.
- Liquid varnish
- Spray varnish
Within those, for Bob Ross painting, spray varnish is recommended.
| Grade | Note | |
| Bob Ross Damar Spray Varnish | Artistic & Bob Ross brand | bob ross product |
| Winsor & Newton Artists’ Aerosols Artists’ Picture Varnish | Artistic grade | Popular spray varnish |
How to prepare Bob Ross technique painting for varnish?
Step 1: Ensure painting is completely dry
Before varnish painting properly drying is quite important. If the painting is not dry and you varnish, there is a very high chance of yellowing. Also, the painting can be discolor.
Step 2: Ensure a clean and dry room
A clean room is very important. If any dust accidentally adds in the painting during varnish time, you can not remove it easily, which will ruin the painting’s appearance.
Step 3: Clean the painting properly
You take 6-12 months to dry the painting. So the painting is already full of dust. That’s why proper cleaning is very important.
Take a microfiber cloth and properly remove all dust from the painting. However, all the dust is not clean yet. Take a hair dryer, set up a cool setting, and blow on the artwork. It will remove existing dust.
Step 4: Store the painting against face with a wall
After cleaning, maybe you can wait for some time before varnishing. It would be best if you stored the painting side to face against the wall. The paint will be temporarily protected from new dust and your pet.
How to apply varnish on the painting?
Step 1: Read the varnish cans back before applying
Don’t ignore the first step. You will get all documentation about how to apply, safety information, and more. Different brands of spray varnish’s documentation can be different. So educate yourself before using any varnish brand.
Step 2: Ensure ventilation
Varnish, especially spray varnish can contain harmful chemicals. So ensure good air ventilation in the room. It will help to remove the aerosol fast from the room. Open all doors and windows and then go for the project. You can use a gas mask, if you have ventilation problems. Highly recommended for completing the varnish project outside of the room.
Step 3: Monitor weather temperature
Very high and ice temperatures are not good for varnish projects. 10-25 Celsius is a good temperature for varnish.
Step 4: Wear protective gear
Wear protective gear, especially gloves and mask. Glaves not only help to prevent sticking varnish on hand but help make it very easy to clean up.
Step 5: Start spraying varnish
Start spraying varnish from the top. Left to right side. Don’t start spraying varnish directly on the painting. If you do it, it will create a huge donut ring on the painting, which ruins your varnish look. Most beginners do this type of wrong.
Start spraying the top-left outside of the canvas and then move fast towards the top left outside. This is a cool and the right technique, following the same method spray full canvas. Then rotate the canvas 90 degrees, and again follow the same method.
Step 6: Coats
Apply 3 or more coats as you want. But before the other coat, ensure the bottom coat is dry. Wait around 30 minutes for each varnish layer to dry. After the last coat, wait 12-36 hours for it to cure completely.
Step 7: After varnish safety
Do not touch the painting after spraying the varnish. Even soft finger touch, you can see easily. Please ensure that little children or pets do not go around the painting before it completely dries.